OmniSharp – Making cross-platform .NET a reality, and a pleasure

In case you missed it, make sure to read Announcing .NET 2015 – .NET as Open Source, .NET on Mac and Linux, and Visual Studio Community because there’s been some big stuff going on.

Here’s the summary of the .NET 2015 Wave of awesomeness.

The other thing I wanted to talk about is a newly organized group of technologies called OmniSharp. Just to be sure there’s no confusion, OmniSharp isn’t a Microsoft project. While there are two Microsoft folks on the team of 8 or so, we are working on it as community members, not in an official capacity.

I “launched” this project in my talk at the Connect() mini-conference in New York a few weeks back. You can watch that video here on Channel 9 now if you like. However, the technologies around and under OmniSharp have been around for years…like over a decade!

As a team and a community we pulled together a bunch of projects and plugins, got organized, and created https://github.com/omnisharp and http://www.omnisharp.net. Jonathan Channon has a great overview blog post you should check out that talks about how Jason Imison created OmniSharpServerwhich is an…

HTTP wrapper around NRefactory allowing C# editor plugins to be written in any language. NRefactory is the C# analysis library used in the SharpDevelop and MonoDevelop IDEs. It allows applications to easily analyze both syntax and semantics of C# programs. It is quite similar to Microsoft’s Roslyn project; except that it is not a full compiler – NRefactory only analyzes C# code, it does not generate IL code.

OmniSharp runs as its own process and runs a local Nancy-based web api that your editor of choice talks to. If you have an editor that you like to use, why not get involved and make a plugin? Perhaps for Eclipse?

We now have plugins for these editors:

  • Sublime
  • Brackets from Adobe
  • Atom from GitHub
  • Emacs
  • Vim

And these work on (so far) all platforms! It’s about choice. We wanted to bring more than autocomplete (which is basically “I think you typed that before”) to your editor, instead we want actual type-smart intellisense, as well as more sophisticated features like refactoring, format document, and lots of other stuff you’d expect only to see in Visual Studio.

We also brought in the Sublime Kulture package which gives Sublime users support for ASP.NET 5 (formerly ASP.NET vNext), so they can launch Kestrel (our libuv based local webserver), run Entity Framework migrations, and other arbitrary commands from within Sublime.
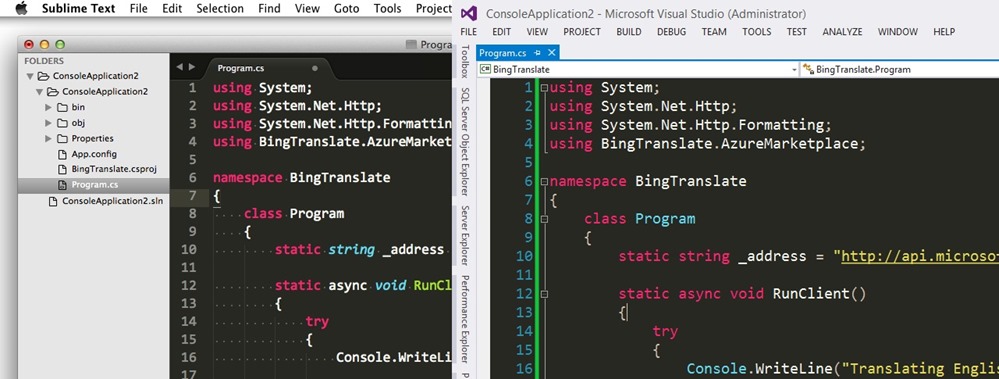
.NET in Sublime, in Vim, in Brackets, in Atom, and everywhere else, cross-platform

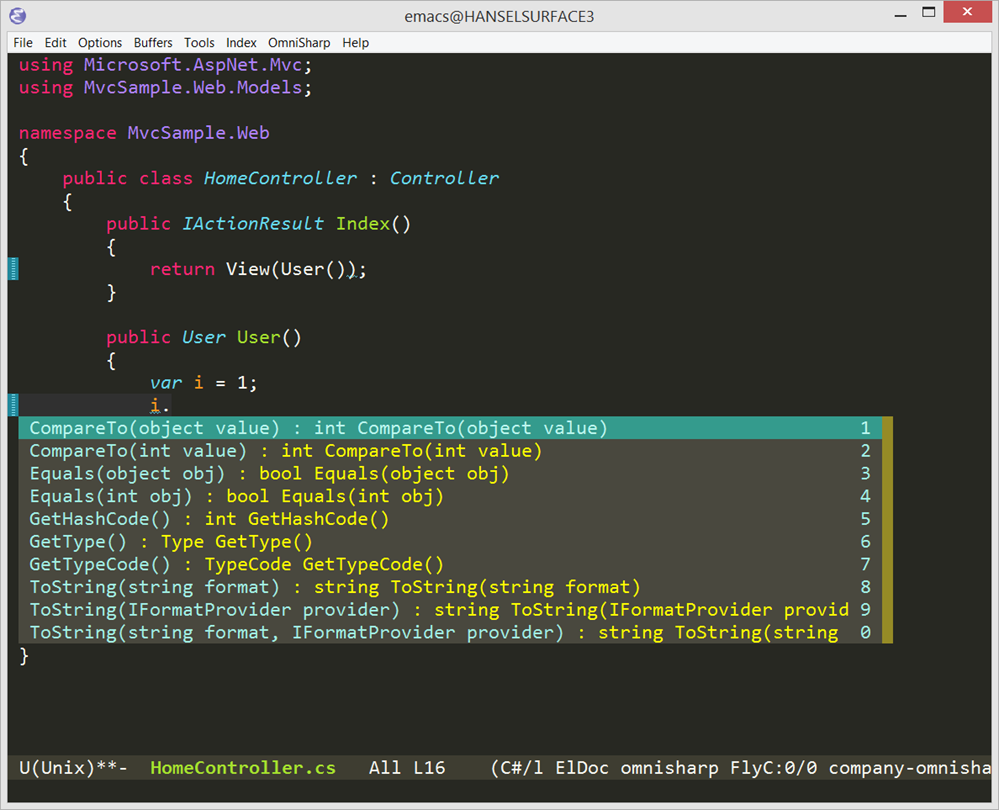
Here’s OmniSharp running in emacs on my Windows machine. The emacs setup (here is an example) is a little more complex than the others, but it also gives emacs folks an extreme level of control. Note that I had to launch the OmniSharp server manually for emacs, while it launches automatically for the other editors.
image

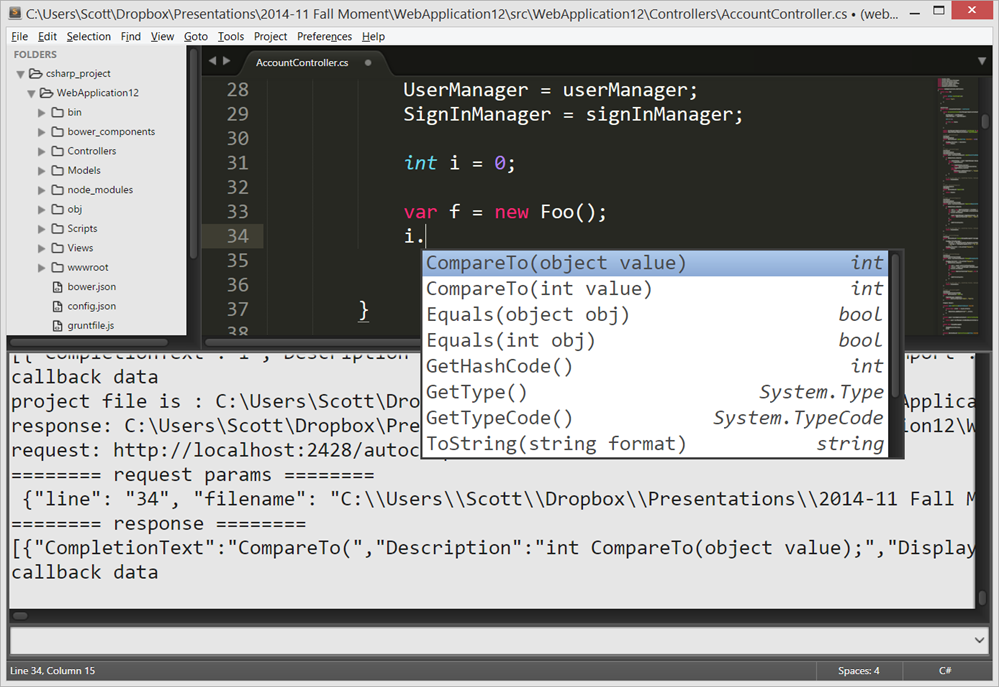
Here is an ASP.NET MVC app running in Sublime. The Sublime OmniSharp package output can be seen in the debug console there (Ctrl+~ to see it).
image

OmniSharp is in very active development. We are looking at bringing in Roslyn, using the new ASP.NET Design Time Host, and improving robustness. It’s not perfect, but it’s pretty darn cool. There’s lots of details in Jonathan’s writeup with great animated gifs showing features. Also note that we have a Yeoman generator for ASP.NET that can get you started when creating ASP.NET 5 apps on Mac or Linux. The yeoman generator can create Console apps, MVC apps, and NancyFx apps.

You can get started at http://omnisharp.net.  See you there!

via: http://www.hanselman.com/blog/OmniSharpMakingCrossplatformNETARealityAndAPleasure.aspx

Synchronizing Files Between Windows Servers

I am sure you have needed to copy files from one server to another. Sometimes it is sufficient to use Windows Explorer across a UNC path and do a simple copy and paste. With that simplicity comes the lack of control and advanced features. Two great free options exist that can be set to run as a scheduled task in a simple batch file, XCOPY and Robocopy.

If you are familiar with XCopy, you know that it has a variety of parameters that can be configured to meet many of your business requirements. If you need more advanced features then Robocopy will most likely meet your needs. You can think of Robocopy as XCOPY on steroids, providing features that tolerate network interruptions, skip identical files, and so forth. The latest version also includes multithread copying.

Robocopy and XCopy are both good solutions to keep a backup copy of your files in a remote location. When your requirements include the need to synchronize the same files across multiple servers, you can setup multiple Robocopy jobs that keep files in sync in multiple directions. That can quickly turn into an administrative nightmare.

Fortunately there is another technology that makes this an easy task to accomplish and administer known as Distributed File System (DFS). This technology started to come to maturity with the release of Windows Server 2003 R2 and continues to improve with each release of Windows Server, including Windows Server 2008 R2 and Windows Server 2012 (also known as Windows Server 8). While there are a multitude of guides on the Internet about DFS including all of the different features and configuration options, I want to hone in on a simple feature that many of us come across regularly; the need to keep a set of files and folders synchronized across multiple servers.

Before we start you should note that in order to properly use DFS, the servers need to be part of an Active Directory Domain. If they are not then you either need to add them to a domain or fall back to using Robocopy or XCopy. In this demo we will be synchronizing a single folder across two servers.

The first step is to install the DFS Role on each of the servers that you want to synchronize files between. In Server Manager, highlight Roles in the left tree view and select Add Roles under Roles Summary.

Roles Summary

This brings up the Add Roles Wizard. On the Select Server Roles page, check the box beside File Services and click Next.

Files Services

On the Select Role Services screen, check the box for DFS Replication. For this scenario we don’t need DFS Namespaces. Click Next.

DFS NameSpaces

Now you will finish the steps of the wizard to install DFS Replication. Once you have DFS Replication installed on each of the servers, we can move forward with configuring DFS Replication.On the server, click Start -> Administrative Tools -> DFS Management. This opens up the DFS Management console. Right click Replication and choose New Replication Group.

DFS Management

You are now presented with the New Replication Group Wizard. Stay with the default selection of Multipurpose replication group and click next.

Replication Group Type

At the next screen give the replication group a meaningful name. You will notice that your default Active Directory domain is set. If not, click Browse… to select it.

Name and Domains

Next select two or more servers that you want to synchronize files across. Click Add and look up the servers in Active Directory. Once you have the servers selected click Next.

Replication Group Members

For the topology, we will select Full mesh. That allows the files to stay in sync between all of the servers regardless of where the file is updated. You will note that to use Hub and spoke, you need at least three servers and it increases the complexity of your DFS environment. I have only had a couple of scenarios where I have needed to use Hub and spoke.

Topology Selection

At this screen you can limit the bandwidth and even configure DFS to run on a schedule. Since we are on an intranet network we’re going to use full bandwidth and we want to keep the files in sync all the time so the default options work well for us. Click Next after you have configured this to your liking.

Replication Group Schedule and Bandwidth

Next we need to select the Primary member. Full mesh topology treats all servers as equals and keeps all the files synchronized nearly instantaneously after the first synchronization is complete and the DFS database is built. For the first synchronization, though, DFS needs to know which server to set as the primary member if there are file conflicts. In that case, it treats the files on the Primary member as the master files just this one time. After the initial synchronization there is no longer a Primary member. Click Next after selecting your Primary member.


Primary Member

It is time for us to select the folders that we want to replicate. Click the Add… button to bring up another window. Click the Browse… button to pick a local folder on this server to replicate. You can use the automatically generated name of the folder or pick a custom name if needed. You will note that you can also set custom permissions. From my experience the default existing permissions will work in most situations. Click the Next button when you’ve picked the local folder.

Folders to Replicate

You are now presented with a screen for the other server that you selected in the replication group. You will note that the local path is not set and it is disabled. Make sure it is highlighted and click the Edit… button. Here you will select enabled and choose the local folder on the remote server. While you can set a target path on the remote server that is different than the path on the local server, I recommend that you keep the paths the same on both servers to simplify management. Click OK and then Next.

Local Path of Temp on other Members

You are presented with the final screen that gives you one last chance to review what you have selected. Once you have reviewed the settings, click the Create button. You will be prompted with a reminder that it will take some time for the initial replication to occur. From my experience it usually takes from 15 – 30 minutes for initial replication to begin. After that, it can take some time for initial replication to complete based on the number and size of the files.

Following the steps above, you can now easily keep sets of folders synchronized between multiple servers.

via: http://www.orcsweb.com/blog/rick/how-to-synchronize-files-between-windows-servers/

Prometric dejará de ser centro examinador de Microsoft

prometric-pearson

En  2007 Microsoft sustituyó a  Pearson VUE por Prometic como proveedor de exámenes, y ahora Microsoft le ha dado la vuelta a la tortilla.

Durante estos últimos 7 años, todo aquél que quería presentarse a un examen de certificación de Microsoft, excepto certificaciones MOS y MTA que eran gestionadas por Certiport,  debía acudir a un centro Prometric. Podías encontrar un centro examinador asociado a Prometric en 160 países diferentes. Concretamente, en España, hay más de 60 centros autorizados por Prometic donde uno puede acudir para presentarse a un examen de certificación de Microsoft.

Curiosamente, cuando en 2007 Microsoft hizo este cambio, la comunidad de programadores en tecnologías Microsoft montó en cólera y en Internet se podían encontrar, y a día de hoy todavía se pueden leer, numerosas críticas en contra de Prometic. Los motivos principales eran dos:

  • El número de centros donde poder presentarse para superar un examen de Microsoft se redujo considerablemente, al menos en Estados Unidos.
  • La usabilidad de la web de Prometric deja mucho que desear.

De esta segunda queja damos fe. De hecho, al principio recibíamos muchas llamadas y correos de nuestros alumnos solicitando ayuda para escoger el centro más cercano a su domicilio y matricularse en el examen. Finalmente decidimos preparar unas breves indicaciones sobre los pasos a seguir, así como una lista con los datos de todos los centros en España que enviamos a todos aquellos que deciden  preparar la certificación con nosotros.

El pasado 14 de julio de 2014 Microsoft anunció que a finales de año finalizará la relación que mantenía con Prometric y volverá a confiar en Pearson VUE como proveedor exclusivo de certificaciones MCP.

Quizás, el hecho de que en 2012 Pearson se haya hecho con el control de Certiport y que en marzo de este año desbancó aO’Reilly consiguiendo la exclusividad en la distribución de los libros publicados por Microsoft Press, hayan hecho que Microsoft otorgue la exclusividad de llevar a cabo los exámenes de certificación a Pearson. De esta forma todas las certificaciones de Microsoft (MOS, MCP y MTA) estarán bajo un mismo paraguas.

Oficialmente Prometric puede seguir suministrando exámenes has el 31 de diciembre de 2014, y Pearson pueden empezar a comercializarlos el 4 de septiembre. Por lo tanto, durante el último trimestre del año se solaparán las funciones de ambas empresas.

Entendemos que este cambio puede provocar cierta inquietud entre los usuarios de este servicio. En este enlace podéis encontrar las FAQ’s que Pearson VUE ha publicado en su web. Aquellas dudas que consideramos más importantes para nuestros seguidores las hemos resumido a continuación:

1- MI CUENTA

¿Qué pasará con mis registros y mi historial de exámenes hechos en Prometric? Todos los registros y las pruebas que has realizado son propiedad de Microsoft, y esta información se mantendrá con Microsoft y será visible en tu expediente académico tal y como sucede hoy en día. Del mismo modo, todos los nuevos registros creados a través de pruebas de Pearson VUE se enviarán a Microsoft para su procesamiento y almacenamiento, y serán visibles en tu expediente académico.

He superado el primer examen para lograr la certificación de Microsoft en un centro de Prometric. ¿Puedo realizar el segundo examen en un centro Pearson? Y si apruebo, ¿obtendré la certificación de Microsoft? ¡Por supuesto! Todos los resultados de tus exámenes son propiedad de Microsoft, por lo tanto el cambio de centro no afectará a tus anteriores certificaciones ni a la ruta que estés haciendo actualmente.

Siempre he realizado mis exámenes en un centro de Prometric. Los resultados de los que haga a través de un centro Pearson ¿serán añadidos a los anteriores o tendré un nuevo historial? Si utilizas el mismo ID de candidato de Microsoft para tus exámenes, tu historial en la base de datos de Microsoft será único.

2- CONTENIDO DE LOS EXÁMENES

¿Qué diferencia hay entre los exámenes de MCP que ofrece Prometric y los que ofrece Pearson VUE? ¡Ninguna! 🙂

  • Los tipos de preguntas del examen que conforman el examen seguirán siendo como antes, pues es Microsoft y no el centro quien toma esta decisión. Como ya saben nuestros alumnos, los exámenes de certificación de Microsoft incluyen varios formatos y tipos de preguntas para evaluar con exactitud el conocimiento y habilidades de los candidatos. Los formatos pueden ser: casos de estudio, simulaciones y laboratorios virtuales. Los tipos de preguntas pueden consistir en: pregunta de ‘respuesta múltiple’, preguntas de ‘hot-area’, preguntas de ‘arrastrar y soltar’ y preguntas de ‘construir y reordenar’. Además, Microsoft introduce continuamente técnicas de evaluación y tipos de preguntas innovadoras, y lo puede hacer sin previo aviso para los candidatos.
  • El número de preguntas tampoco varía. Sin embargo, como os decimos siempre, Microsoft no proporciona información sobre el número de preguntas incluidas en cada examen, aunque lo habitual es que ronden las 50 o 60 preguntas (al menos en exámenes de certificaciones de desarrollo). Esto ayuda a mantener la seguridad del examen y el valor de las certificaciones.
  • La puntación del examen se seguirá haciendo como hasta ahora.

¿Se producirá algún cambio en el precio del examen? No. Los exámenes típicos de certificación de Microsoft (MCTS, MCITP y MCPD) suelen costar sobre 140€, aunque los precios finales vienen fijados por cada centro examinador en cada país, dado que ellos pueden aplicar a mayores unas pequeñas tasas en calidad de alquiler de equipos, recursos…

3- VALIDEZ DE LOS VOUCHER DE PROMETRIC

¿Qué ocurre si ya tengo concertada la fecha de mi examen MCP con un centro Prometric? No hay ningún problema. Podrás hacer tu examen en el centro de Prometric que hayas solicitado antes del 31 de diciembre de 2014.

¿Puedo usar los voucher de Prometric que ya he comprado? Tenemos tres posibles situaciones, fíjate bien cuál es tu caso:

  • Cualquier voucher de Prometric que no haya caducado y hayas pagado antes del 4 de septiembre puedes usarlo para hacer el examen antes del 31 de diciembre de 2014 en cualquier centro, bien Prometric o Pearson VUE.
  • Todos aquellos voucher  comprados en Prometric después del 4 de septiembre caducarán el 31 de diciembre de 2014, por lo que deberás canjearlos antes de final de año.
  • Cualquier voucher de Prometric que no haya caducado y que no haya sido usado, puede ser utilizado para programar un examen a través del sistema de registro de Pearson VUE después del 31 de diciembre de 2014.

¡Esperamos que este post te sirva de ayuda!

via: http://www.campusmvp.es/recursos/post/Prometric-dejara-de-ser-centro-examinador-de-Microsoft.aspx