Tag Archives: Visual Studio

OmniSharp – Making cross-platform .NET a reality, and a pleasure

In case you missed it, make sure to read Announcing .NET 2015 – .NET as Open Source, .NET on Mac and Linux, and Visual Studio Community because there’s been some big stuff going on.

Here’s the summary of the .NET 2015 Wave of awesomeness.

The other thing I wanted to talk about is a newly organized group of technologies called OmniSharp. Just to be sure there’s no confusion, OmniSharp isn’t a Microsoft project. While there are two Microsoft folks on the team of 8 or so, we are working on it as community members, not in an official capacity.

I “launched” this project in my talk at the Connect() mini-conference in New York a few weeks back. You can watch that video here on Channel 9 now if you like. However, the technologies around and under OmniSharp have been around for years…like over a decade!

As a team and a community we pulled together a bunch of projects and plugins, got organized, and created https://github.com/omnisharp and http://www.omnisharp.net. Jonathan Channon has a great overview blog post you should check out that talks about how Jason Imison created OmniSharpServerwhich is an…

HTTP wrapper around NRefactory allowing C# editor plugins to be written in any language. NRefactory is the C# analysis library used in the SharpDevelop and MonoDevelop IDEs. It allows applications to easily analyze both syntax and semantics of C# programs. It is quite similar to Microsoft’s Roslyn project; except that it is not a full compiler – NRefactory only analyzes C# code, it does not generate IL code.

OmniSharp runs as its own process and runs a local Nancy-based web api that your editor of choice talks to. If you have an editor that you like to use, why not get involved and make a plugin? Perhaps for Eclipse?

We now have plugins for these editors:

  • Sublime
  • Brackets from Adobe
  • Atom from GitHub
  • Emacs
  • Vim

And these work on (so far) all platforms! It’s about choice. We wanted to bring more than autocomplete (which is basically “I think you typed that before”) to your editor, instead we want actual type-smart intellisense, as well as more sophisticated features like refactoring, format document, and lots of other stuff you’d expect only to see in Visual Studio.

We also brought in the Sublime Kulture package which gives Sublime users support for ASP.NET 5 (formerly ASP.NET vNext), so they can launch Kestrel (our libuv based local webserver), run Entity Framework migrations, and other arbitrary commands from within Sublime.
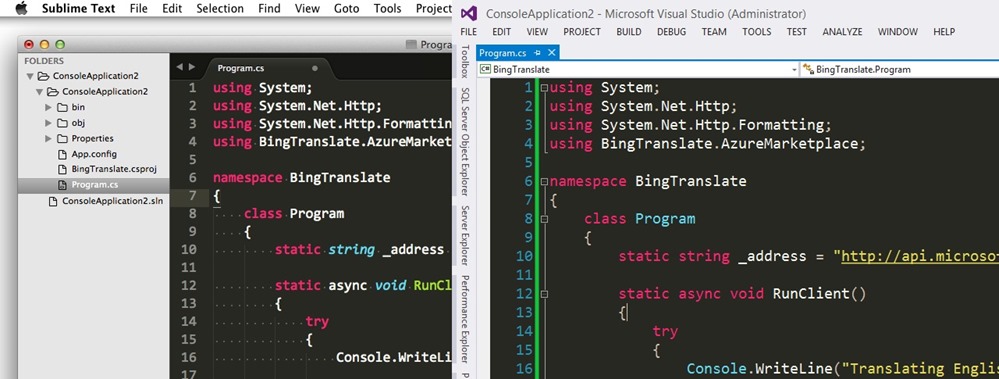
.NET in Sublime, in Vim, in Brackets, in Atom, and everywhere else, cross-platform

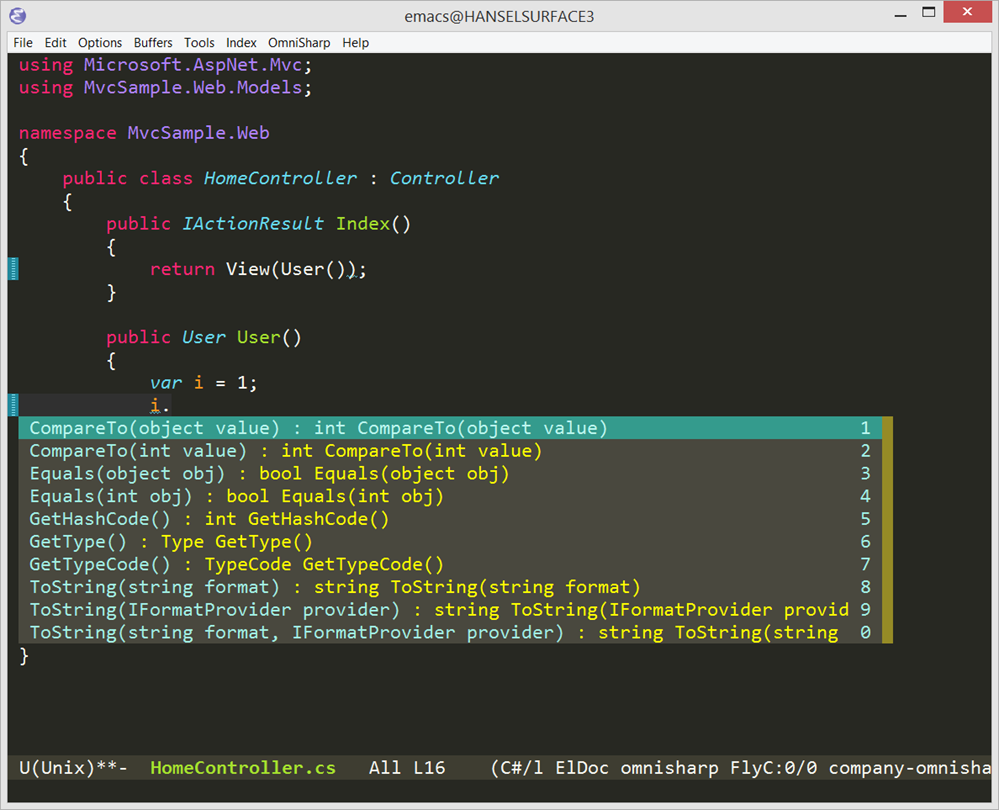
Here’s OmniSharp running in emacs on my Windows machine. The emacs setup (here is an example) is a little more complex than the others, but it also gives emacs folks an extreme level of control. Note that I had to launch the OmniSharp server manually for emacs, while it launches automatically for the other editors.
image

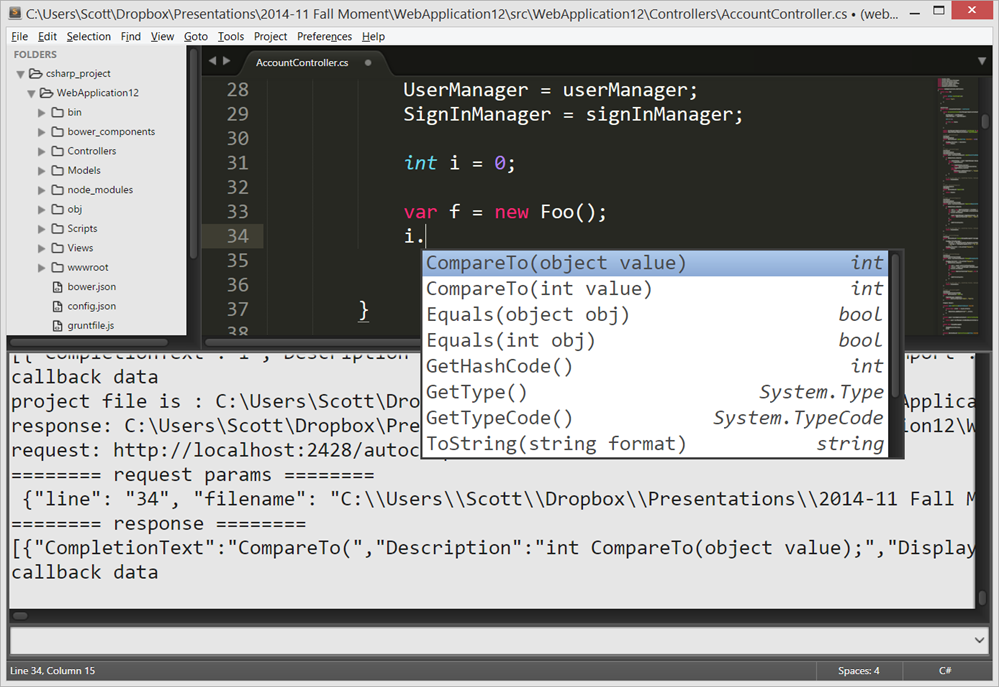
Here is an ASP.NET MVC app running in Sublime. The Sublime OmniSharp package output can be seen in the debug console there (Ctrl+~ to see it).
image

OmniSharp is in very active development. We are looking at bringing in Roslyn, using the new ASP.NET Design Time Host, and improving robustness. It’s not perfect, but it’s pretty darn cool. There’s lots of details in Jonathan’s writeup with great animated gifs showing features. Also note that we have a Yeoman generator for ASP.NET that can get you started when creating ASP.NET 5 apps on Mac or Linux. The yeoman generator can create Console apps, MVC apps, and NancyFx apps.

You can get started at http://omnisharp.net.  See you there!

via: http://www.hanselman.com/blog/OmniSharpMakingCrossplatformNETARealityAndAPleasure.aspx

How to: Specify a Port for the Development Server

In Visual Studio, you can select from several Web servers: IIS, IIS Express, or the built-in Visual Studio Development Server. For information about the differences between these servers, see Web Servers in Visual Studio for ASP.NET Web Projects.

By default, when you create a Web site or a Web application project in Visual Studio that uses IIS Express or the Visual Studio Development Server, a port is selected for the project. For example, if you are testing a page named MyPage.aspx, when you run the page using IIS Express or the Visual Studio Development Server, the URL of the page might be the following:

http://localhost:31544/MyPage.aspx

If you want to run the project on a specific port, you can configure the Web server to do so.

NoteNote
Visual Studio cannot guarantee that the port you specify will be available when you run your file-system Web site. If the port is in use when you run a page, Visual Studio displays an error message.

To specify a port for a Web site project that uses IIS Express

  1. In the Tools menu, select Options and then General.
  2. Make sure the Always Show Solution option is selected.
  3. In Solution Explorer, right-click the project name and then click Remove. This removes the project from your solution, but does not delete the corresponding files on disk.
  4. Click OK.
  5. In Windows Explorer, navigate to the IIS Express ApplicationHost.config file. By default, this is located in the following folder:%systemdrive%:\Users\<username>\Documents\IISExpress\config
  6. Open the ApplicationHost.config file in a text editor such as Notepad. In the sites section, search for the Web site name.
  7. In the bindings section for the Web site, change the port binding.The following example shows the bound port set to 40955.
    <site name="WebSite1" id="1">
       <application path="/" applicationPool="Clr4IntegratedAppPool">
          <virtualDirectory path="/" physicalPath="C:\WebSites\WebSite1" />
       </application>
       <bindings>
          <binding protocol="http" bindingInformation="*:40955:localhost" />
       </bindings>
    </site>
  8. Save the ApplicationHost.config file and close the text editor.
  9. In Solution Explorer, right-click the solution, select Add, and then select Existing Web Site.
  10. In the Add Existing Web Site dialog box, make sure that the Local IIS tab is selected.
  11. Under IIS Express Sites, select the site for which you have changed the port number, and then click Open.The project name contains the URL with the new port number for the Web site (for example, http://localhost:40955/). If the solution was created at the same time as the original Web site project, the previous port number will still be part of the solution name (for example, localhost_40954).
  12. To update the solution name to reflect the new port number, in Solution Explorer right-click the solution name, select Rename, and then specify a new name.
  13. On the File menu, click Save All.
  14. To verify the change, press CTRL+F5 to run the project.The new port number appears in the address bar of the browser.

To specify a port for a Web site project that uses the Visual Studio Development Server

  1. In Solution Explorer, select the project name.
  2. In the Properties pane, set Use dynamic ports to False.This enables editing of the Port number property.
  3. Enter a port number for the Port number property.
  4. Click outside of the Properties pane. This saves the property settings
  5. To verify the change, press CTRL+F5 to run the project. The new port number appears in the address bar of the browser.

To specify a port for a Web application project that uses IIS Express

  1. In Solution Explorer, right-click the name of the application and then select Properties.
  2. Click the Web tab.
  3. In the Servers section, under Use Local IIS Web server, in the Project URL box change the port number.
  4. To the right of the Project URL box, click Create Virtual Directory, and then click OK.
  5. In the File menu, click Save Selected Items.
  6. To verify the change, press CTRL+F5 to run the project.The new port number appears in the address bar of the browser.

To specify a port for a Web application project that uses the Visual Studio Development Server

  1. In Solution Explorer, right-click the name of the application, and then select Properties.
  2. Click the Web tab.
  3. In the Servers section, under Use Visual Studio Development Server, select Specific port.
  4. Change the port number.
  5. In the File menu, click Save Selected Items.
  6. To verify the change, press CTRL+F5 to run the project.The new port number appears in the address bar of the browser.

via: http://msdn.microsoft.com/en-us/library/ms178109.ASPX

Adding Log4Net to your MVC project

Log4Net supports writing to multiple sources through the use of “Appenders”. For this post, we will take a look at the AdoNetAppender which allows us to easily write logs to a database table. To begin lets create a new MVC project.

Next we add a reference to Log4Net using the NuGet package manager.

To continue, add a new XML file to your solution, name it Log4Net.config and then copy the following code into the new file. http://pastie.org/6118426 The AdoNetAppender can get tricky because it has a few options that usually go undiscussed. The first tricky part to note here is the “bufferSize” attribute which when set to 0 indicates not to use buffering. Once we complete the Log4Net configuration we will see that logging data to the table is very easy and that it will not be extraordinary to log more than 10 messages for each page request depending on the amount of work a page processes.  To mitigate the impact increased database traffic would have on performance the AdoNetAppender allows us to batch these inserts into the log table. However, I recommend leaving this setting at 0 until you notice a performance impact. I consider this the first hiccup for installing Log4Net as some examples I have seen set this value to 10 and then skip discussing this piece. This usually makes it look like logging is not working when we run a simple logging test with one example message because only after we have 10 messages will the entire buffer be flushed and written to the database. Another core feature of Log4Net is the ability to configure your log level. Log4Net captures information in prioritized categories.

  • Fatal
  • Error
  • Warn
  • Info
  • Debug

In our example we have configured the Appender to capture information at the INFO level. Unless we change this setting our messages created under the DEBUG category will not get saved to the database. However, we will still see the more severe categories of FATAL, ERROR, and WARN in addition to INFO. By using this priority of severity I find most projects do not need the buffering option and are instead deployed with a WARN or ERROR level setting while the DEBUG and INFO settings are reserved for developer workstations and QA servers not being load tested. Another hiccup I usually see is found in the insert statement itself. Make sure your insert command matches the log table you created. For our example we will use the following SQL to create a log table.

CREATE TABLE [dbo].[Log4Net] (
[ID] [int] IDENTITY (1, 1) NOT NULL , [Date] [datetime] NOT NULL , [Thread] [varchar] (255) NOT NULL , [Level] [varchar] (10) NOT NULL , [Logger] [varchar] (1000) NOT NULL , [Message] [varchar] (4000) NOT NULL , [Exception] [varchar] (4000) NOT NULL
) ON [PRIMARY]

The last piece to discuss is the connection string which I intentionally left as “{auto}” in our example. By default this configuration file is not loaded by the application and as such our logging is not yet enabled. Also, in most scenarios, we want to use the same database connection string throughout the application. To accomplish both of these goals I created the following helper classhttp://pastie.org/6118219 After copying this class into your project simply call the public method “InitializeLog4Net” during the “Application_Start” event of your Global.asax.cs class. The Log4NetManager class will load our Log4Net.config file and the Appender configuration it contains. Next it will find the AdoNetAppender settings we just loaded and override the connection string (if it is set to “{auto}”) with the connection string specified for our entity model which takes care of keeping our two connection strings synchronized! At this point, Log4Net is configured and ready to run. All we have to do now is create some log entries.

To create our log entries we need an instance of a logger. The typical usage scenario is to get a logger that represents the class you are working in, as we do here using the typeof operator. After that we can create error messages by category. In this example “logger.Debug” will be ignored by the logger because we set the log level to INFO. In the second example we insert our test message “HELLO WORLD” and then finally we catch and report an exception message that occurred from an InvalidOperationException. Now, each time the Home/Index action runs it will insert two new records into the Log4Net table in the Northwind database as configured by the our entity connection string. via: http://www.oakwoodinsights.com/adding-log4net-mvc-site/